Right click in the output tag grid and select Create History to open the Build History window. Select which tags to backfill, a start and end time, a step size, and a file location. These backfill files must then be imported using the Calcs Convert Importer.
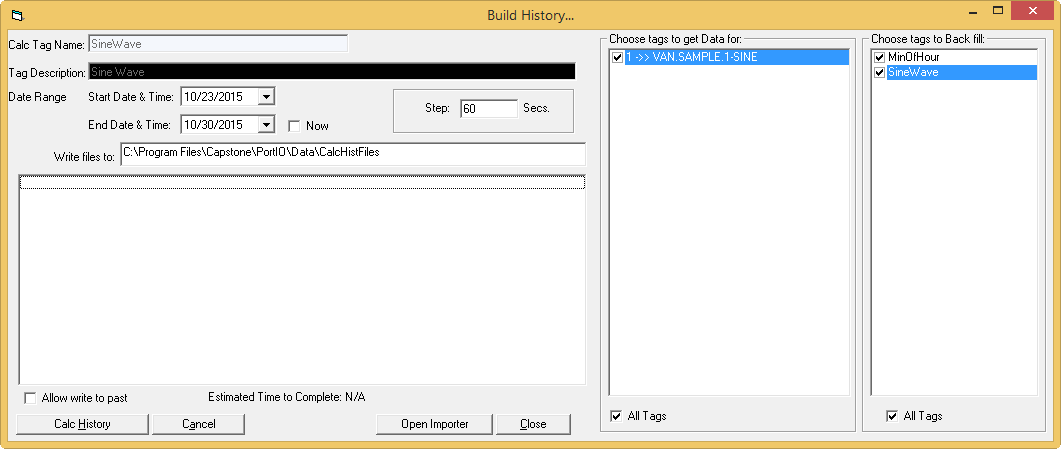
Calc Tag Name: The name of the calc tag. This field is read-only.
Tag Description: The description of the calc tag. This field is read-only.
Date Range: The date range of values to save for the history file.
Now: Uses the current time as the End Date & Time in the date range.
Write Files to: The folder to save the history file.
Step: The step size in seconds to normalize the historical values.
Allow Write to Past: If checked, data will be directly written to history. If unchecked, a data file will be generated that must be imported with the Calcs Convert Importer.
Estimated Time to Complete: An estimate of the time expected to create the history file.
Choose Tags to Get Data for: A list of calc tags to get data for.
All Tags: Selects all calc tags in the list.
Choose Tags to Backfill: A list of input tags to backfill.
All Tags: Selects all input tags from the list.
Calc History: Writes a history file to the Write Files to address.
Cancel: Stops the creation of the history file.
Open Importer: Opens the Calcs Convert Importer.
Close: Closes the window.