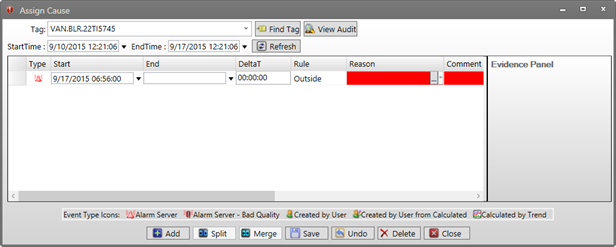
Tag: The tag for which events are shown, automatically populated from whichever display was used to open Assign Cause. In the drop-down menu, choose from the tags in the trend to view alarm events for that tag. If opened from a centerline, only the selected tag will appear.
Start Time/End Time: Shows the start and end time for the range of events. Events calculated from trend can only be retrieved if the trend is set to that date range. The Assign Cause window cannot find alarms calculated by trend from outside of the trend’s time frame. If the events are Alarm Server or Created by User type alarms, new start and end times can be entered. The Refresh button will retrieve events created by the alarm server.
Find Tag: Opens the Tag Browser.
View Audit: Shows a list of changes for the selected event. A row in the events grid must be selected.
Refresh: Refreshes to show alarm events from the Start Time to the End Time if the times have been changed.
Events: All alarm events from the current tag between the Start Time and End Time are shown in order by Start Date.
Type: Events are categorized based on how they were created. The Event Types and icons are shown in a Legend.
Start/End: The start and end time for each event can be edited. If the start and end time for a calculated is changed, the event Type will change to Created by User from Calculated.
DeltaT: The duration of the alarm from Start Time to End Time.
Rule: Either the Alarm rule or SQC rule violation that caused the alarm.
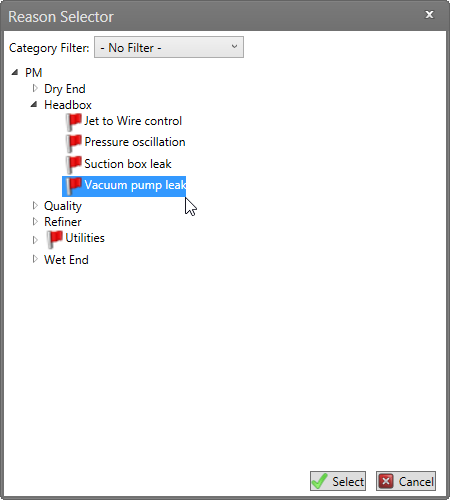
Reason: A user can specify the reason why the Alarm occurred. Clicking the … button will display a reason tree. Each level of reasons can be expanded by clicking the + button. Assigning a reason changes the state of the alarm to Acknowledged. If neither a reason nor a comment is given, the Reason cell display will appear red.
Asterisk (*) / Repeat: Clicking the “*” button next to the reason field repeats the last assigned reason to the event. If a comment or evidence were entered, those are copied, too.
Comment: A user can comment on the Alarm. This changes the state of the alarm to Acknowledged. If neither a reason nor a comment is given, the Comment cell will appear red.
Logbook: If the selected Tag’s process area is configured to allow for manual logging in a Logbook, then a Logbook can be selected. If not, an Auto Logging window will appear prohibiting manual logging.
Process: The process area of the alarm event for reporting alarms by process in Pareto charts.
Equipment: The equipment that was affected by the event. Assign a value from PARCview’s preconfigured equipment list.
Grade: The grade that was being produced during the event, determined by the alarm tag’s process grade tag.
Evidence Panel: Displays tags associated with the reason for an event. An aggregated value of the evidence tag over the duration of the event can be attached to the event. For example, the average value of a machine speed tag may be used as evidence for a slowdown event. Evidence tags can be configured in System Configuration.
Add: Adds a Created by User event. A new row will be added to the list. The timestamp will be now with a duration of 1 minute. The start and end times can be edited and reasons and comments can be applied.
Split: Splits the event into two events. When clicking the Split button, a new window will appear. In this window, the duration of each alarm can be assigned as well as a reason and a comment. By default, if a reason or comment already exists, they will be applied to both events.
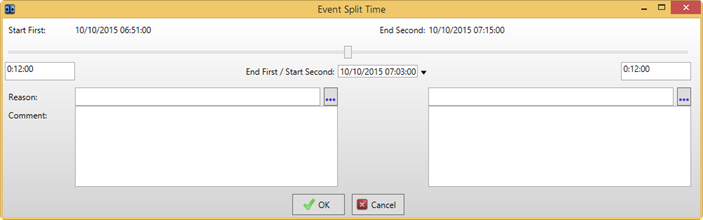
Use the slider bar at the top to change the split time or edit the End First/Start Second time field. The new event durations are shown in cells at the top left and top right. Click the OK button to save the changes.
Merge: To merge rows, selected the desired rows and then click on the Merge button.
Acknowledgment Warning: If the select event has not met its configured closing criteria, the acknowledgment warning (red exclamation point) will appear. Hover the cursor over the icon to see a tooltip that describes the alarm’s acknowledgment and closing criteria.
