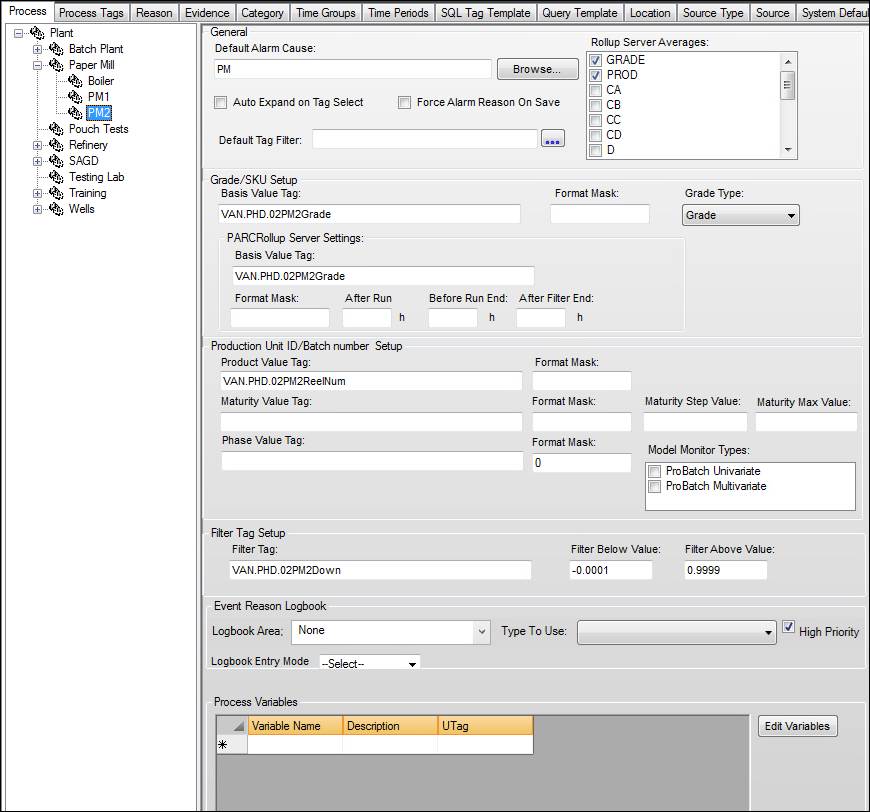
Use the Process tab to configure the process tree and process area settings.
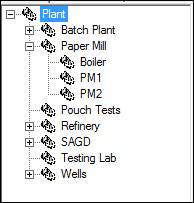
Process Tree
The process tree contains the site’s process areas. Expand and collapse the tree by clicking the “+” and “–” buttons next to the process names. Clicking a process name selects it and displays its process configuration.
The process tree has a hierarchical structure, but this is strictly organizational. In other words, there is no parent/child-type or inheritance-type functionality. Some “parent” process areas might not actually be configured for use and instead simply act as containers for logical groups of process areas.
Process Tree Right-Click Menu
Configure the process tree using the right-click menu.
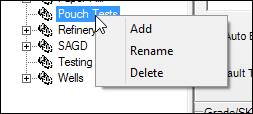
Add: Creates a new process beneath the selected process area.
Rename: Changes a process area’s name.
Delete: Removes the process area, as well as any process areas beneath it in the tree. Any tags that belonged to this process area or its children will be reassigned to the Unidentified Process.
General
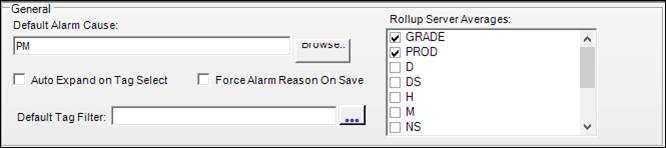
Default Alarm Cause: When alarm events are being assigned a reason from the reason tree, this is the beginning or top branch in the reason tree that will be displayed for all tags assigned to this process unit. The reason tree can be displayed by clicking the “Browse” button to the right of the entry field. Click on the desired branch and it will be copied to the configuration window. This is useful for truncating the tree for users that only deal with tags in a certain process area.
Auto Expand on Tag Select: When the reason tree is displayed, this setting will automatically expand the sub reason trees to show lower levels.
Force Alarm Reason On Save: When this setting is enabled, an alarm opened in trend cannot be saved until a reason is assigned.
Default Tag Filter: Preconfigured tag filters can be defined for assignment to applications that need to filter data based on criteria for another tag, like downtime. Clicking the ![]() opens a window to select the filter. The description will be shown as well as any required parameters that need to be defined, like Min and Max.
opens a window to select the filter. The description will be shown as well as any required parameters that need to be defined, like Min and Max.
Rollup Server Averages: These are the period types that the PARCrollup Server will use when calculating run statistics for tags in this process area. The available period types include process-dependent time periods like GRADE and PROD (product), default time periods like D (day) and H (hour), and any custom time periods that have been defined, like production days or crew shifts.
Checking a period type makes it available for rollup.
Grade/SKU Setup
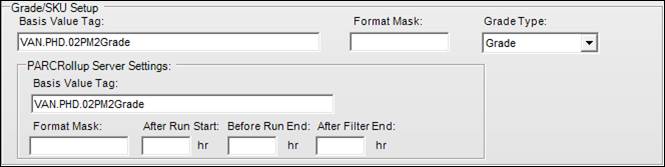
Basis Value Tag: Also called a “grade tag”, this tag should reflect the type of product (called “grade” in some industries) the process is making. This applies to processes that switch from producing one type of thing to another, making the distinction between those periods of time meaningful. The values of the grade tag must match the grade names defined in PARCview’s Grade Maintenance. The grade tag specified here is used to generate Grade-type runs in Run Browser, to define grade-based tag limits, and to apply grades to MDE records.
Format Mask: The format mask is used to convert a numeric representation for a grade (typical from a DCS) to the format used by the quality and product handling system. For instance, a format of “###-##” will convert a DCS grade number of 56532 to 565-32.
Grade Type: The type of grade used in the process area. A grade type essentially correlates to a list of grade names. Grade Types are configured in Grade Maintenance.
PARCrollup Server Settings: The PARCrollup Server must have its own grade tag definition.
Basis Value Tag: Same as described above. Reasons to use a different grade tag here include manipulating the start and end time of runs to reflect a time of interest vs the actual length of the run. The time filters that can be applied in this section are absolute, whereas a calculated grade tag could apply filtering logic to each run to produce the desired run times.
Format Mask: Same as described above.
After Run Start: The amount of time to exclude after the grade run starts in hours or a fraction of hours (e.g. 0.5 for half an hour).
Before Run End: The amount of time to exclude from the end of the grade run in hours or a fraction of hours.
After Filter End: The amount of time to exclude after the process filter ends in hours or a fraction of hours (see Filter Tag Setup).
Production Unit ID/Batch number Setup
The product tag setup defines parameters that determine which product is being made.
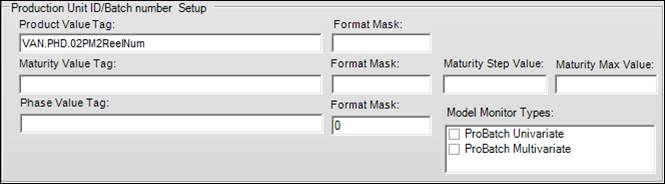
Product Value Tag: This tag shows the product number that the process is running.
Format Mask: Applies a mask to the output value.
Maturity Value Tag: The maturity tag is used to describe the extent that a product has matured, or the percent complete. Maturity tags are primarily used in a batch process to normalize data between runs to a variable other than time.
Maturity Step Value: The step size to normalize the maturity tag. Leaving this field blank uses the raw timestamps of the tag.
Maturity Max Value: The maximum value for the maturity tag. Once the tag reaches this value, the run ends.
Phase Value Tag: Tag that returns the phase a process is in. Phase tags must have numeric values. If the process phase tag has text values, a calculated tag must be created to convert the value to numeric (PHASE1 = 1, PHASE2 = 2, etc.) Phases are defined by grade in the Grade Maintenance window.
Model Monitor Types: If licensed, model types for ProBatch can be selected.
Filter Tag Setup

Filter Tag: The value of the filter tag determines whether the process is “up” or “down”. In other words, the filter tag determines whether the values being collected are worth analyzing or should be removed from calculations because they were collected when the process was not actually producing anything. It’s also worth emphasizing that the filter tag removes time, not certain values like a min/max filter. All tags in the process should be up or down at the same time. Filter tags typically have values of “0” or “1” that correspond to the up and down states. The tags may come directly from the process, or be calculated based on several inputs.
Filter Below Value: Apply process filter when the filter tag has value below this amount. For example, if the tag’s value of “0” means the process is down, filtering below “0.5” would work.
Filter Above Value: Apply process filter when the filter tag has value above this amount. For example, if the tag’s value of “1” means the process is down, filtering above “0.5” would work.
Event Reason Logbook
Use this section to configure Alarm Event integration with Logbook. When an alarm event is acknowledged from Trends or Centerlines, a corresponding Logbook entry can be created.

Reason Logbook: The Logbook area that new alarm events can be logged to.
Status To Use: The default status to use when logging events.
Log as High Priority: Alarm events will be logged as High Priority. This sends an email of the entry to the recipient(s) specified in the Logbook area’s configuration.
Logbook Entry Mode: Choose how the event is logged:
None: The event cannot be logged from a trend or centerline.
Automatic: All events in the process area automatically create Logbook entries when acknowledged.
Manual: New events can be manually added to the Logbook through Trend or Centerline. A user cannot add an event to a Logbook without the necessary access level.
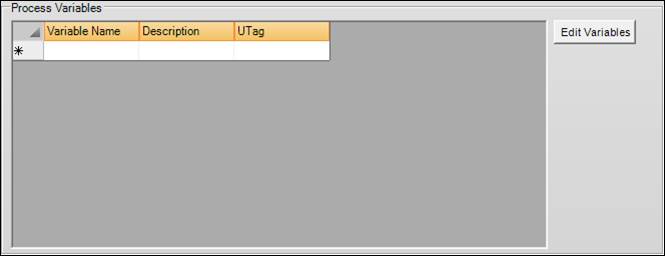
Process Variables
Any variable added to the Process variables list can then be automatically added a trend if a tag from this process is added to a trend. In Client Configuration window, theses Process Variables can be selected to automatically be added to any trend built for this process area. For example, if the grade and product tag are added to this list, when a tag from this process area is added to a trend, it will add the Process Variable tags as well.