Header Columns and Write Protect
To adjust the caption of the header columns under the grid caption, double click inside a field and enter a new caption. Preventing users from editing the grade of product or the start and end time is also configurable in the Displays Tab.

Column: Displays the name of the header of the column. This name will not be shown on the MDE display.
Caption: The text that will be displayed at the top of the header column.
Visible in Grid: Shows the heading and column on the display. If the checkbox is deselected then the column is hidden.
Allow User to Edit: Allows a user to change the value of a cell in the column. Record State cannot be modified.
Warn On Change: When this setting is on, any change to the selected column will cause a window stating “You’ve made a change to [caption]. Would you like to keep the change?” appear. This is useful to prevent users from accidentally changing the value of the grade or product from the source tag’s value.
Write Protect MDE:
Write protect MDE display for all users: Restricts all users from editing the MDE.
Allowed for all: Allows all users not specifically listed in the Restricted Users/Computers list to modify the MDE.
Restricted for all: Allows only users specifically listed in the Allowed Users/Computers list to modify the MDE.
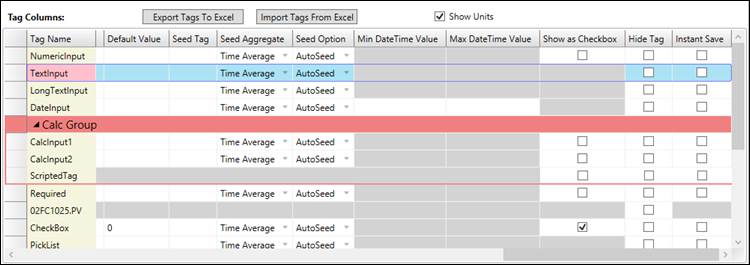
Tag Columns
The bottom section of the Display Columns tab is where the user can add new tags to the MDE display.
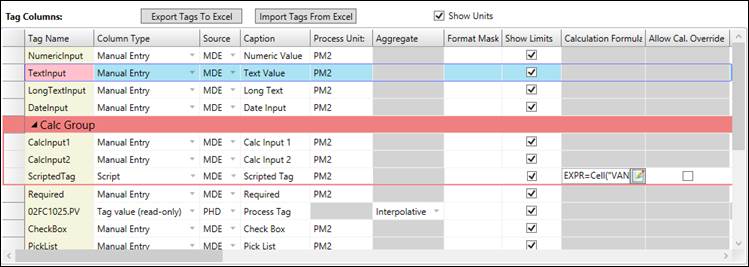
Export Tags To Excel / ImportTags From Excel: Excel can be used to quickly create similar tags. In the Excel document the tag’s configuration will be displayed. Making a new tag is possible by adding a new row with a Tag Name. Tag configuration can then be easily copied down the rows of the Excel sheet. Once the sheet is setup, then the tags can be imported into the MDE.
Show Units: Shows the units under the caption in the header of the tag’s column in the display.
Column Type: When adding a new tag, the tag can have several purposes or several different “Column Types”:
Manual Entry: The user will enter the value for the tag. This value can also be “seeded” by another tag’s value and then saved as is or modified.
Scripted: The tag will be calculated from other inputs with the option to overwrite.
Tag-Value (Read-Only): Will display the value of another tag. If this is a process tag with continuous values, the value will be interpolated to the record’s time based on the specified aggregate setting. This value is read only.
Source: The source where the MDE tag will be saved in the database. Must be an MDE-type data source for MDE entry tags.
Caption: What is seen as the header for the column in the main MDE screen. This field will automatically populate with the Tag Name.
Process Unit: The process unit assigned to MDE tag.
Aggregate: The “Aggregate” field has several different options and is only available when the “Column Type” is Tag-Value. This defines what value will show in the MDE for the specific tag. The options are: Interpolative (linear interpolation at time of record), Total, Average, Time Average, Count, St. Dev, Minimum Actual Time, Minimum, Maximum Actual Time, Maximum, Start, End, Delta, Variance, Range, Duration Good, Duration Bad, Percent Good, Percent Bad, Last.
When calculating an aggregate, if either the start time or end time is not present (based on the MDE header template configuration), the MDE will use its counterpart, making the start time equal to the end time. Yet to satisfy OPC HDA standards, where start time being equal to end time is invalid, one second is added to the end time. If there are no points within the interval, some aggregates, such as Interpolative and Time Average, will return a value because of interpolation, while others will return a 0 or a null. MDE does not currently support retrieving data points before or after a given time for use in these aggregates.
Format Mask: The format mask is how the data will be displayed in the MDE, entering a format mask of “#.0#” will show two decimals if applicable and at least one decimal.
Show Limits: Shows the limits configured for the specific tag in the MDE Display above the Column Headers.
Calculation Formula: If the Column Type is set to Script then the tag will be a calculation formula, this option will only be enabled when set to Script. Clicking inside the field on the book icon will open the Script Editor.
Allow Cal. Override: Allows the user to enter a value overwriting the calculated value.
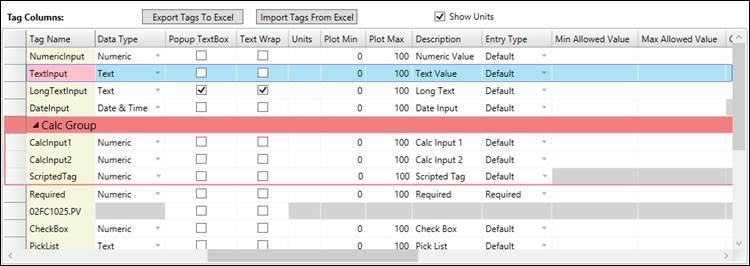
Data Type: The Data type can either be a Numeric, Text Value, or a Date and Time.
Popup TextBox: The Popup Textbox setting changes based on the Data Type.
Date and Time: A date and time calendar picker will appear when the cell is clicked on.
Text Value: A textbox will appear when the cell is clicked on.
Numeric: This setting does nothing when the Data Type is numeric.
Units: The units that will be saved with the tag in the tag browser. The units will also display in the header of the tag’s column if show units is selected.
Plot Min / Plot Max: When trending the MDE tag the Plot Min/Max will show up as the default min and max for the trend.
Description: The description of the tag that will display in the tag browser.
Entry Type: When setting up the MDE certain columns/tags can become required each time the user adds an entry. The options are Default (Set in Grade Specification, usually Optional), Optional, Recommended, and Required. In the Colors and Fonts tab the outline color of the different entry types can be configured so the user can identify required, recommended, etc. fields.
Min Allowed Value / Max Allowed Value: MDE has the capability to restrict user from accidently entering in bad data. By entering either a max or min in the “Min/Max Allowed Value” fields, the user is unable to enter a number outside of the set range.
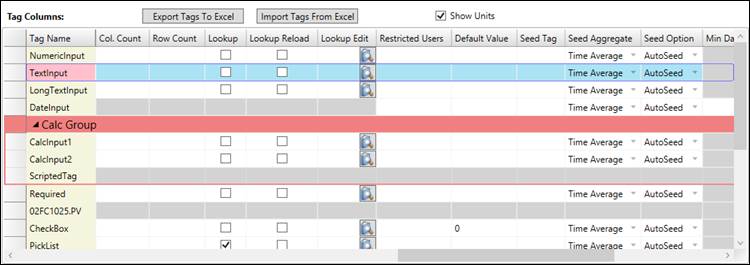
Col. Count / Row Count: By entering the row count in the Multi-dimensional Row Count, this will show a matrix that has x rows in the one MDE column. The same goes for the Multi-dimensional Col Count, these two can be used together. This can be also used if the operator or technician is require to take three tests for one sample this can be shown as the average in one field.
Lookup: Sometimes there are only certain values that a tag can have, to make this easier on the user a “Lookup” or dropdown can be added to a column by checking the “Lookup” field and editing the lookup with the “Lookup Edit” field. Before editing the tag needs to be saved, a display message will prompt saving the tag when first setting up the lookup.
Lookup Reload: If checked, the MDE display will reload the picklist values for this tag on each refresh. This is used when the lookup picklist is being dynamically populated programatically. (Note: not required for picklists based on query templates, which are always dynamic.)
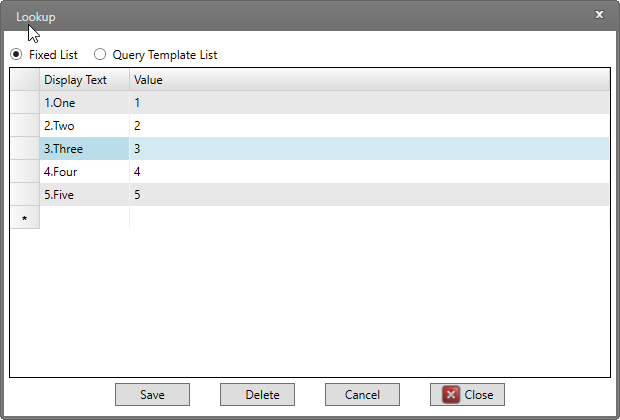
Lookup Edit: Build the picklist used to enter data for the MDE tag. Choose from a fixed list (user-defined here in the MDE) or a query template list, where the picklist values are populated dymanically by the query. See Query Template for more information.
Display Text (Optional): This is the text the user will see and select in the picklist.
Value (Required): This is the data saved to the database. This can be text-, numeric-, or date-type data. Make sure the data type of the values matches the data type of the MDE tag. If no display text is entered, these values are shown in the picklist.
Restricted Users: Some entries may be only tested by certain users, some users may be restricted from modifying certain MDE values. This is achieved by entering the user’s computer name or login name in the “Restrict Users” field. Note these are tag-specific settings. Security can also be set a the display level.
Default Value: The value that will be assigned to the tag when a record is created. This is useful if a tag typically has the same value. The value can be subsequently modified when necessary.
Seed Tag: The Tag ID of the seed. The value of the Seed tag will appear in the cell for new records.
Seed Aggregate: Defines the aggregate used to display as an initial value.
Seed Option: The seed option defines when the cell will calculate from the value of the seeded tag.
AutoSeed: Automatically populates the cell when a record is created.
Auto with Manual: Automatically populates the cell when a record is created. Right-clicking on the cell will recalculate the seeded value. Useful if the seed value changes after record creation.
Manual Seed:Only seeds the value upon request. Useful if there are many seed tags that can cause slowness on load, or if the seed value relies on calculations based on other MDE values in the record.
Min DateTime Value / Max DateTime Value: Use for data validation of datetime-type MDE tags. Set the newest and oldest allowable dates to prevent values too far in the past or in the future.
Show as Checkbox: Makes the Tag a checkbox. Checked boxes will be given the value of 1 for that timestamp and unchecked boxes will be given the value of 0.
Force Change Comment: Forces a comment when a saved MDE value is changed.
Hide Tag: Toggles the visibility of the tag in the display.
Instant Save: When a value is entered into an instant save cell, the entire MDE is instantly saved, if possible.